A Start-To-Finish Guide To Designing Your SaaS App

Bruce Peck
Dec 13, 2021 · 11 min readIntroduction
So you’re planning on building an app? Maybe you’ve got a genius idea, but maybe you’ve never actually gone through the process of creating software before and perhaps it seems like a daunting process.
Using the design process, you can find out whether or not your potential users will love or hate your idea before you ever have the first line of code written.
Design is a silent art that is rarely consciously observed but underpins all of the built world.
Think about it, painted lines on the road, your toddler’s iPad, the movement of your closet door, the process of filing your taxes, everything that you interact with was created and thought through by humans to achieve an end, thus they were designed.
Good design, like the iPad, seems to be in the words of Johny Ive, Apple’s former head of design, “so completely inevitable and obvious, so uncontrived and natural” that you almost can’t imagine any better way to implement it.
Bad design, like the process of filing your taxes, feels like the creator of it either designed the process to torture the public or simply just does not care at all what they’re asking you to do and if it is comprehensible (which with taxes both may just be the case).
The natural next question is, how do I create a good design? How do you make your app feel like an iPad rather than the tax code?
Luckily, the process of design, particularly for software development, is a well-paved road. It is not easy, because it requires many revisions and hard work, but it is reliable, repeatable, and gives you real data about how your app will work before it’s even built.
The design process consists of the following steps:
- Research and empathize
- Defining the Problem
- Ideate and project scope
- Develop and build Model
- User testing
- Iterate
Research and Empathize
Many aspiring entrepreneurs skip this step and go straight into designing their product because they believe they already know what users will want, but out of all these steps, this one is perhaps the most fundamental.
In the research phase, you learn about the nuances of the industry you’re looking to be a part of, learn from and discuss your idea with experts in the field and discover in what ways you might be able to create the biggest impact you can with your product.
You will also explore what products are already out there, what users like about the products they currently use, what the market size is, how to position your product against the incumbents, what you can charge, and more.
Many people are consciously or unconsciously hesitant to research because of two main reasons: first, they are afraid to find out their idea has already been “taken” and secondly, they are afraid to ask other people about it in fear that someone will “steal their idea.”
However, it is critical that you enter the process of developing an app with your eyes wide open. If competition already exists, great! You can learn from other’s mistakes and create an app that is better for a significant group of potential users.
If they’ve already built the best app out there and have a super loyal user base, don’t waste your time building it! Move on to the next idea, and yes there will be more.
To address the concern of someone stealing your idea, we have to be real with you. The vast majority of apps die silent lonely deaths on the app store because nobody finds them useful, not because the idea was stolen.
It seems quite obvious to say but, you have to talk to people to understand what they want.
The only way to figure out if people are going to find your app useful is to go talk with tons of them, in-depth about your idea.
If your idea is so brilliant and someone comes along and steals it, then there should be plenty of room in that market for competition. (Plus the odds of anyone willing to take the idea, fund it and give the sweat required to take it all the way to realization are extremely low).
Now that that’s out of the way, in the research stage, you should be pulling all the information together about your concept as possible. Look into the businesses that already occupy the space and see how profitable they are.
Look at their feature sets, is there something missing? Dig into their reviews, what do users love? What do users hate?
Never just guess about this, or you wind up with marginal problems to solve. Find some juicy, painful, hard to solve yet a widely experienced problem.
Not dumb things like, “I sometimes eat a salad with soup and I hate switching between a spoon and a fork, so I’m calling my solution 'spork.'”
Define the Problem
Once you’ve done your research it’s time to define exactly what problem you solve and who you are solving it for. The value proposition and user persona do just that. A value proposition is a statement of what major benefit you are trying to offer the customer.
Here is an example of Uber’s Value proposition:
“Tap the app, get a ride. One tap and a car comes directly to you. Your driver knows exactly where to go and your payment is completely cashless.” You can tell that they did their homework in the research phase because they are answering many of the most common problems with taxi services with simple and appealing solutions.

The value proposition acts as a north star for design, there are many different ways to solve the same problems, but knowing what you want to solve allows you to be able to tell if you are doing it right.
The second piece is to understand who your target audience is, you do this by creating a “user persona,” which is the “who” your value proposition is for. So let’s take Uber’s value proposition from above, who has the problem of hailing a taxi? Just brainstorm for a second. How about:
- Business executives
- People out on the town
- Travelers coming from an airport
- Workers who need to commute to the office each morning
- Etc.
Each of these different types of people has a need for the value proposition that Uber offers and is a potential customer of the app. So they are worth getting to know since their unique situations can really assist in doing well-informed design.
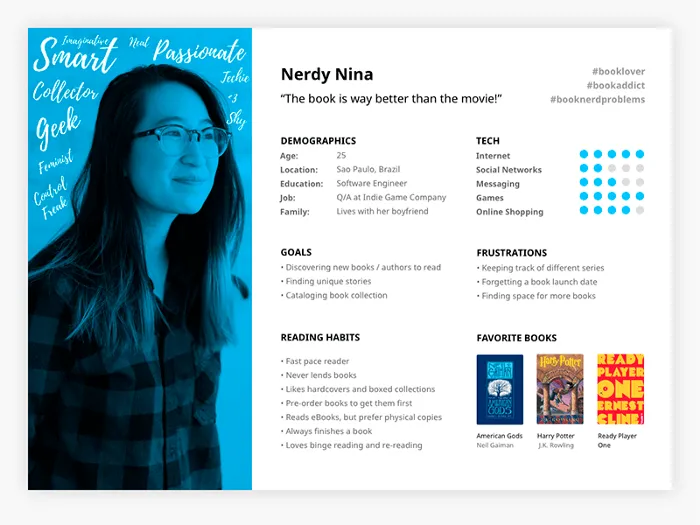
A great user persona has the following pieces of information about the persona: A name, a quote from a real person, demographic information, their goals, their frustrations, and any other information related to the value proposition, here’s a great example from Dani Guerrato.
If you’re looking for more detail on how to figure out what your value proposition should be, feel free to check out our article 5 steps to turn your app idea into a viable business.
Ideate and Project Scope
Once we have a clear idea of the goal of the app (value proposition), who it’s for (user persona), why it’s needed (research) the next step is to decide what we’re going to build. With Approachable Geek this is usually when we’ll have the client hop onto a video call with us and we’ll pull up a web whiteboard and just brainstorm freely on what needs to be built.
The goal of these meetings is to get everything out of the head of the client onto the board. The process is often messy because even though the solution may seem clear while it’s sloshing around in someone’s mind, once you vocalize the concept contradictions and incompatible elements soon become clear.
Once the chaos of the initial brainstorming session begins to settle, we work through all the ideas and group them into logical categories and create “user stories” which is essentially an explanation of a feature from the perspective of a user.
This allows us to then pull in a programmer to estimate out how many hours it will take to build each feature. From there we have a fairly clear understanding of the range of time the total project will take to build.
Build a Model
The visual representation of a user interface is called a UX wireframe. It is a draft of the visual architecture of your app and determines how your users will interact with your product.
Starting with paper, you take your goals and ideas and create a “blueprint” of how your app is going to look and function. It is helpful to begin this process on paper because it is very easy to make changes and you can even do some initial testing with your friends or family.
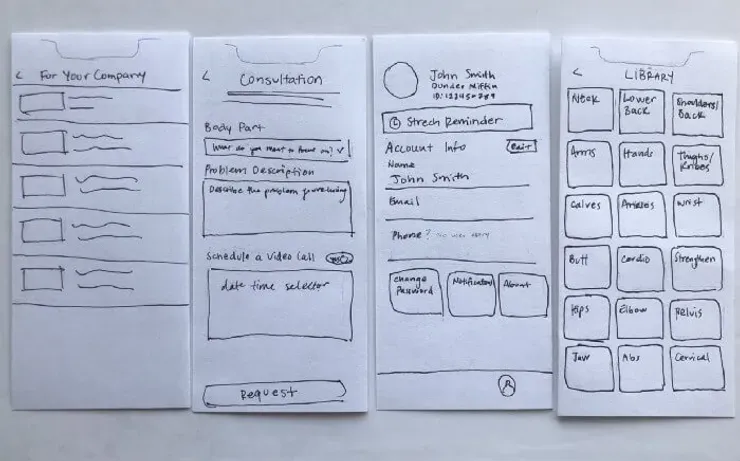
Don’t worry about how your app looks, this step is about coming up with the flow and structure of your app. In fact, if your app looks amazing at this point, you’re probably going to end up with a beautiful app that doesn’t function well.
Keeping your designs at low-fidelity means changes are easier to make than later on when you’ve established a UI style. Think of this step as determining the skeleton of the app, vanity will come later.
After the paper prototype phase, designs are moved onto a digital platform like Sketch, Figma, or XD. It’s important to keep the designs low fidelity (without colors or styles) so that you can maintain flexibility, allowing you to pivot and make large changes to your app when you discover it’s needed (and you will).
User Testing
To understand why you should perform user testing with your product, you must first understand what user testing is. With purposeful scripts and questions, a user tester can gather data and insights into the product as a whole or just a portion of it.
At its core, user testing is about quantifying how someone uses your product which is often different from how you had imagined.
User testing can find errors and areas that need improvement through observing and recording a set of tasks for the user to perform.
It is important to note that If you test with users that have seen your design progress and change, they will be comparing their experience to their previous experience and they will already have a mental map of how the app flows which will incorrectly give the designer the impression that changes they have made have worked.
When testing a product, it is good to be in the real-world since the product will be used in the real world as well. Here’s an example of a user testing session and the insight we managed to pull from a user testing session.
Test scenario
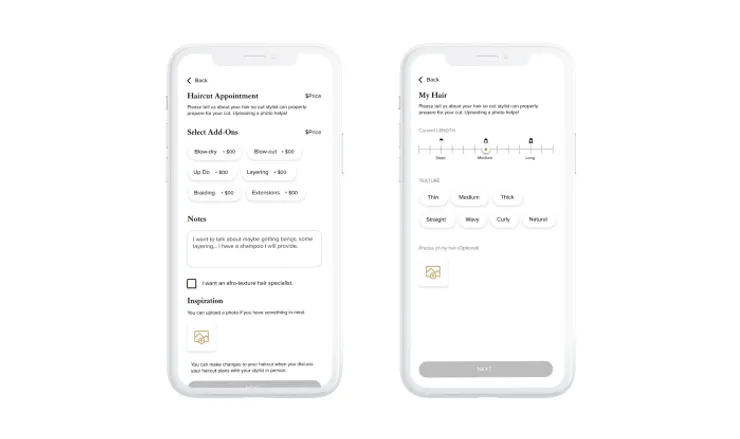
“You are booking a haircut where the stylist will come to your home to perform the service.” When user testing, it is good to leave the scenario as open-ended as possible. We want to observe the order in which users perceive each element of the design without distracting them with a task or goal. This allows us to find out whether or not users naturally understand the purpose of the screen without any clues from us.
Task and Question Examples
We then like to ask questions that don’t invite criticism or praise from the user:
- What do you see on the screen?
- What do you think this is for?
We then move on to asking about specific elements of the design:
- What information do you find is most valuable?
- Are pictures or text more important for you?
By asking the users to look at individual elements of the design, we are inviting our participants to give deeper consideration to their thought process, in this case, when booking a haircut to be performed in their own home. It is these types of questions that yield critical insights on how the flow of the interface should be designed.
The Key Thing Learned
We discovered that our screens were in the wrong order and our users identified that they should answer questions about the current state of their hair before talking about what they wanted from the haircut.
In all likelihood, the order of two screens in the flow would not have broken the app, but with all the minor changes that are made as a result of insights pulled from multiple user testing sessions, this app looks and flows a whole lot better than before the user testing. Here’s another example of the impact of user testing.
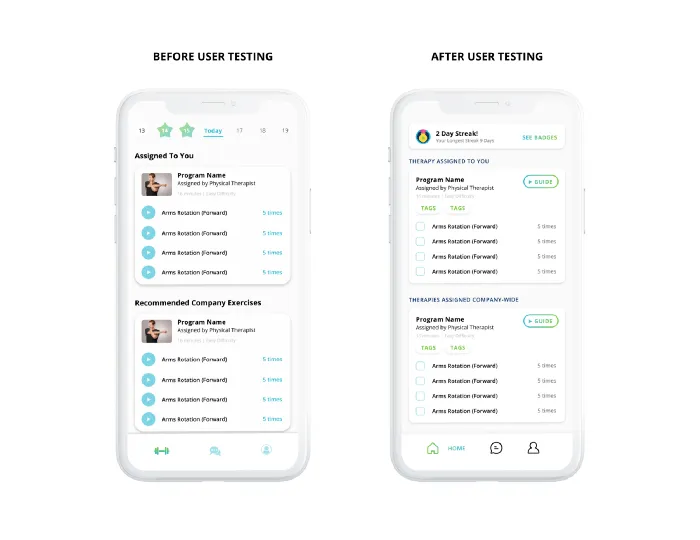
Here’s another example of the impact of user testing. Here you can see the UI we tested with and the UI that was created based on the feedback we received from the user testers.
All the little things that users said and interacted with gave us an insight into what was good and what wasn’t. Because of this, we were able to revise the design to how you see above, communicating streaks in a much better way now than before.
These tests help to iron out any final usability issues that are not easily discoverable during the creation process. By testing with more users, you can get more statistically significant results to validate your product before launch.
By this point, you might be thinking “there is no way this is going to save me time.” In some cases, you might be right, but you may be wrong when you think about long-term benefits. User testing can save you from making costly mistakes now rather than later. Changing the order of screens or the format of tracking streaks is almost zero cost before the engineers get involved.
The reality is that the longer you wait to discover big problems with your product, the longer it will take for you to fix those things down the line. The more complex the product becomes, the harder it becomes to find and fix new problems.
Iterate
Using the feedback gathered in user testing, designers will organize a list of changes that they’ll make in the design. The iterative design process consists of continuing this cycle of testing and iterating until you have your app in a place that you feel very confident pushing it.
However, we live in a fast-paced world and in order to keep your app relevant, you will have to continue iterating and making changes based on user feedback. Otherwise, you risk your users losing interest. Updates keep users engaged and curious about the future of the app.
You want to build the best product possible. You want your users to enjoy and find value in every aspect of their experience. You want to build a successful app. You will need to go through the design process to accomplish these goals.
Conclusion
Hopefully, this article has given you a much clearer understanding of what it takes to create a great design. The key is to always remember who you are building for, what they need, and how they understand the world.
That being said, understanding the steps in the process of design is easy enough, but actually implementing them can be quite challenging, especially if it’s your first time around.
Luckily, that’s what we do all day. If you’re ready to get started with your own design project, and app development or just have a few questions, schedule a meeting with us!